Posted by Chris on April 30th, 2007 in Update | Comments Off on April 2007 Summary
Things are moving forward fast now that I have the basic outline of a frame done. I’d been putting off a lot of things waiting on it, including installing the Rockler Bearing/Lazy Susan.
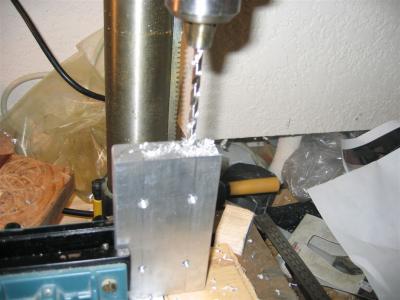
I decided to leave the original plastic wrapper on while I drilled the holes, and I also pulled back the plastic and taped off the area on both sides where I would be drilling to make doubly sure nothing would get inside the bearing and lock it up later.
First Problem – I tried to align it inside the dome ring using the tried and tested method of using coins to center it, but there was an issue. If you’ve been following my progress and have a good memory you’ll remember that the dome ring wall varies in thickness. On the outside it’s perfectly round, but on the inside it varies a lot, making it hard to use coins to center the bearing in place.
Using some calipers I figured out 4 spots where I though the wall thickness seemed to be close enough and placed my coins there. It wasn’t perfect, and I was repeatedly tweaking and re-measuring for the longest time. In the end 3 nickels and a one cent taped together seemed to do the trick. They weren’t tight tight, so I used some clamps to lock the bearing in place while I drilled.


Drilling into the dome ring went fine and I don’t think I got any metal shaving in the bearing. After that, and in short order I popped out the little plastic lugs and drilled out the outer bearing ring holes to attach it to the frame.
I still need to attach Daniels inner dome plate and get slightly longer screws that attach the Rockler to the dome, but that’s an easy fix.

Posted by Chris on April 30th, 2007 in Body, Dome | Comments Off on Rockler Installed
I made a start today on mounting the electronics like the speed controllers, Vex Micro controller, Fuse Block/Circuit Breaker, Power Distribution Board etc.
At first I was pretty sure I could fit everything on the plate I’d cut and mounted. I’d done some rough measurements a few weeks ago and it looked like everything would fit on one side.

But today I laid everything out and it’s just too tight, especially when you start wiring things up it’s going to get ugly fast.

I think I’m going to move the CF3 Sound Card and RF Remote to the back (inside) of the mounting plate.

Just over a week ago my wife Tammy took this photo for the R2 Builder C4 Year Book.

Now a week later the stack of parts looks like this 🙂

Posted by Chris on April 28th, 2007 in General | Comments Off on 10 day difference
Made a start on the Center Leg Mount last night. They’re based on a design by Atomic Pickle/JAG.
Started off with some aluminum plate and a nice block of 3/4″

I didn’t have access to a mill, so I rough cut the parts. I then sanded the block down on my bench sander till it fit and marked off the holes ready for cutting and tapping.
I’ll probably still go back at some point and mill out the center to reduce the weight.

Block inserted in leg


I still need to get some spacers to go between the plate and the frame.

More photos
Posted by Chris on April 27th, 2007 in Legs | Comments Off on Center Leg Mount Plate/Block
Tags: ankle, atomic pickle
I was able to use a friends lathe and mill again last night, and got a few more parts of the frame made. I’m now at the point where it actually looks like a frame, and can hang it from the legs if I want. I Still need to machine 8 more rods for the lower section and I should be done.
Some advice on tools – don’t buy a cheap Harbor Freight Tap and Die Set. They’re not worth the money and I wasted an evening last week fighting the small crappy tap wrench that came with mine. Trust me go out and buy a beefy set or just the taps you need and a good $20 tap wrench. Your hands and patients will appreciate it.
Someone also gave me a tip that I’ve not tried yet, but supposedly you can use a cordless drill to tap the hole using forward and reverse and low torch. My drill is dead and waiting a new battery otherwise I this would have saved me a lot of time. Hopefully it’ll show up before I need to tap my last set of rods.
Next thing on my list to machine are two plates to attach the center Ankle/Leg to the bottom of the frame.
Oh! and did I tell you this thing weights a ton?


The Feet and Drive System arrived today from Jerry. I’m speechless yet again.
More photos here.

Posted by Chris on April 24th, 2007 in General | Comments Off on Feet Arrived Today
On a tip off from a fellow builder I bought a few of these cheap motors for $45 vs $150 for the NPC-2212’s.
I already had my NPC-2212, but thought these would make for good spares, and apart from the extra holes and a longer drive shaft they’re a perfect match.

The NPC-2212 is on the right with the long leads and the cheap OEM motor on the left. Click on the image for more photos.
They can be found here.
Your mileage may vary!


