As I said in my post last night I was able to start on fitting the two domes together.
I’d already read about Victor’s problems on fitting his domes. From his photos I don’t think mine were as bad but I definitely had gaps. You can’t see much once the domes are on top of each other so I had to spin the outer dome around and peek thru the top holoprojector hole and check spacing.
I did some light sanding but things we’re changing much, so being the impatient person I am I decided to use a power sander and give the top of the inner dome a once over to try and remove some of the waves/lines. Fit was much much better and I decided to remove the pie panels and see how far I needed to go.
I’d already read Jerry’s tutorial over at Astromech.net so rather than repeat too much stuff here. I’d strongly recommend reading it if you’re just starting on your R&J Dome.
I “crafted” a mini saw out of a cheap/small hacksaw blade with some duct-tape wrapped around it. I didn’t want to use a standard hacksaw blade as they looked too big and the recommendation was to use an Xacto-hacksaw which I couldn’t find locally. So my make-shift mini-saw did the trick.

Here’s the top of the dome all cut out.
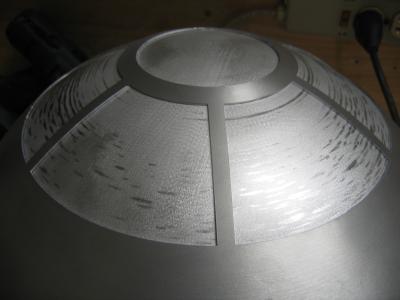
The only place there was any significant gaps where at the bottom of the pie wedges. Not huge I know and I’m thinking I may not even need to do much more once I factor in the glue that will be holding things together. However if I decide to use hinges then I may need to tweak the gap some.

So the plan today is to do some additional fitting and checking the other panels. I know there’s space behind some and I also need to clean up areas of the inner dome that will be exposed thru the outer.
Maybe I’ll even get to cutting some holes today.
As always more pictures in the Dome Album.
Posted by Chris on January 1st, 2007 in Dome | Comments Off on Dome Fitting / Gaps Part 2
Just got the PSI Blinker Units from Fiber Optic Products.
This is somewhat of a warning, and time saver to others to get the right thing the first time. If you’ve ever tried to use their website you’ll understand my frustration and confusion. And their return policy is a nightmare to read. They’re email address also doesn’t work and they never answer the phone.
I’d ordered the Dual LED Blinker Unit based on recommendations on the Builders Forum

There’s two reasons I’m disappointed, 1) the flash/blink is not very accurate at all, and 2) the description reads like the flash rate was adjustable – but they’re not. Here’s the text from the website –
“The New R2D2 Unit will flash the Red Long, Blue Short, or Yellow Long, Green Short. The Duel-2 unit has adjustable speed for each LED. Please select color choice. DO NOT turn pot full or you will burn out unit!”
They have another well hidden page that’s the New Dual-2.

I know I know, they say that in the text for the Dual but it sounded like that’s what I was ordering.
Boards look identical BTW – just a variable resistors/pots in two spots instead of a fix resistor, so I may try and swap them out if I can’t return them.
The only saving thing was that they’re were only $8.50 a piece.
I really should have just waited for the next PSI run from Dan.
Posted by Chris on January 1st, 2007 in Dome, Electronics | Comments Off on PSI Blinker Units from Fiber Optic Products
Tags: blinker, psi
Tonight has been a night of gaps, both good and bad.
It’s New Years Eve and what have I been doing? Sanding Aluminum for the last 4 hours in a cold garage.
The good news is that I was able to get the inner dome to fit over the dome ring tonight with the correct gap at the bottom.

All it took was lots of Dremel work with the mini sanding disks. I bought a new box of 60 grit drums for the Dremel and they seemed to last a bit longer than the one’s that come in the original kit. I did try the grinding disk attachment too, but it was slow going and it seems to be polishing more than removing stuff, so I gave up and went back to the sandpaper drums.
I had considered running the dome against my bench sander, but decided not to after a small slip and I touched a shiny part of the ring that really didn’t need sanding. No biggy and lesson learned.
I continued to sand, test fit, rotate and mark spots that were touching, followed by more sanding, test fits, rotate …. repeat for 2 hours.
I’d been working so intently on the inner dome I’d clean forgot to check the fit with the outer dome attached. What I’d forgotten was that the inner dome is not as deep as the outer and sits up in the outer dome a bit. So I really didn’t need to get the inner dome to go all the way down on the lip. Luckily I stopped sanding the ring in time and a quick check showed that I was very close to the correct gap at the bottom when I had the two domes and the ring together. But I did panic for a moment.
On the last lap around the ring I ran a hand electric sander around with some 100 grit paper. Both inside the dome and the ring. It smoothed things out and was the last step needed to get things to snuggly fit together. I may go back and polish it later.
I’d also made a start on sanding the inner dome and test fitting it with the outer. I even went as far as removing some of the pie panels, but I’ll blog about it tomorrow and post some pictures.

Posted by Chris on December 31st, 2006 in Dome | Comments Off on Please Mind the Gap
I finally got my hands dirty for real today. Made a start on fitting the inner dome to the ring.
The R&J Domes are great and for the outer dome not much work is needed as all the hard work of marking/cutting has already been done by laser. However, as some of you may know the inner dome and ring need some work. I think everyone I’ve spoken to has had to tweak, cajole and/or modify the inner dome to fit the outer dome snuggly, and for some, myself included, trying to get the inner dome to fit over the dome ring can be an issue too. All this is due to the the variable nature of the manufacturing process of spinning the domes – or so I’m told. Plus the thickness of the wall on the ring varied.

I got my Dremel out and tackled fitting the ring to the dome. I’d read a lot on the builders forum as well as various builders blogs, but nobody seems to agree on the best way forward. Some suggested in no particular order –
- Cut the ring lip down in height and sand to a point until the dome fits.
- Simply sand the inside of the dome AND the ring lip.
- Take it to a machine show to get them to do it.
- Cut slots in the ring and tweak/bend it to make it smaller so the dome fits over.
- Heat dome up in hot water, cool down ring in ice – resulting in a change in size and easier fitting.
Someone also recommend that I do not cut the ring lip down in size as it may cause problems further down the road.
Well I chose option 2 for now, as it seemed the easiest and least destructive – and I was able to at least get the dome to fit over the ring proper. It doesn’t go down all the way yet, but it’s a good start and I’m relieved that it looks like this method may work.

I just took my Dremel and slowly went around both the ring and the inside of the inner dome. I focused more on the ring as it’s thicker and had some spots where it was obvious where I could remove more material.

More photos in the gallery.
That’s it for now. I’ll probably finish this up tomorrow with a bit of luck and can start fitting the outer dome.
A few more parts arrived today: Rear Logic Electronics, Aluminum Front Logic Sorrounds , Aluminum Feet Half Moons.
I also placed an order with Jerry for a Center Ankle. It’s in stock so should ship soon.
It feels like it’s been a long wait, but the R&J dome finally arrived today.
Couldn’t wait to get it out of the box and do a quick test fit of all the pieces.

This thing is sweet. I even stuck in one of my new aluminum holo projectors. How cool is that?
It definitely needs some tweaking to get the inner and outer domes to fit snuggly over the ring.
I’m excited to get to work on it over the holidays starting next week.
Just got my periscope kit today from Scot, a fellow R2 builder.
Needs cleaning, bending, gluing etc, but shouldn’t take too long to assemble.

Here’s what it should look like when I’m done –

More photos in the parts gallery.
Posted by Chris on December 15th, 2006 in Dome | Comments Off on Periscope Kit
I scored some front logic electronics from Jason and Ben. I’m really please I was able to get one of these kits. Ryan had a set on his dome at the last prop party and I was suitable impressed.

Here’s a small movie by Jason on what they look like running.
Posted by Chris on December 6th, 2006 in Dome, Electronics | Comments Off on Front Logic Electronics


